Here is a high-quality blog post drafted specifically for the 'My Core Pick' audience.
Breathe Easier: The Quick DIY Filter Swap That Boosts Your Car’s AC and Air Quality
Have you ever hopped into your car on a hot day, cranked the AC to the max, and felt… underwhelming results?
Maybe the air felt weak.
Or worse, maybe it smelled a bit like old gym socks or wet dog.
I have been there, and I know exactly how frustrating it is.
Your immediate thought might be that your AC compressor is dying or that you are low on Freon.
Those are expensive fixes.
But here at My Core Pick, we love finding the simple, overlooked solutions that save you money.
In this case, the culprit is likely a $15 part that you can replace yourself in under ten minutes.
I’m talking about your Cabin Air Filter.
It is the unsung hero of your car’s HVAC system.
Today, I’m going to show you why swapping this out is the best thing you can do for your lungs and your car’s performance.
The Mystery Component You Probably Forgot About

Let’s be honest.
Most of us know we need to change our oil.
We know we need to check our tire pressure.
We even know about the engine air filter that keeps dirt out of the motor.
But the cabin air filter?
It often goes completely ignored until a mechanic suggests it (and charges you $80 for the labor).
This filter has a very specific job.
It cleans the air that comes from outside the car before it enters the interior through your vents.
It catches dust, pollen, smog, and mold spores.
Think of it like the furnace filter in your house, but for your car.
If you haven’t changed it in the last year—or 15,000 miles—it is almost certainly clogged.
A clogged filter restricts air.
Restricted air means your AC has to work twice as hard to cool you down.
4 Tell-Tale Signs Your Filter is Clogged
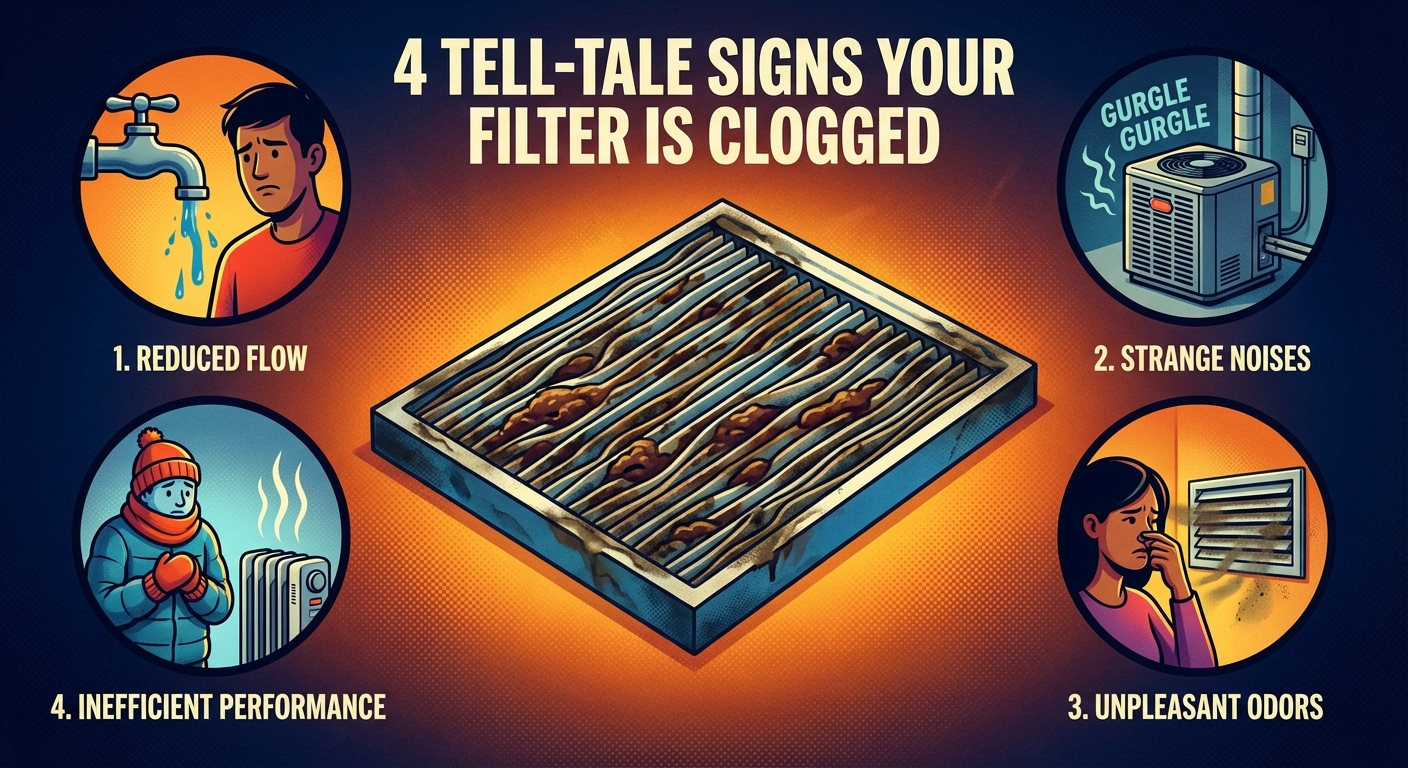
How do you know if it’s time for a swap?
You don’t need a diagnostic computer to figure this out.
Your car will tell you.
Here are the four biggest red flags I look for.
1. The "Musky" Smell
This is the most common complaint I hear.
You turn on the fans, and you get a blast of stale, musty air.
That smell is usually trapped moisture and contaminants sitting on the filter material.
It’s gross, and frankly, you shouldn’t be breathing it in.
2. Weak Airflow
Is your fan set to the highest setting, but it feels like it’s on low?
If the fan creates a lot of noise but very little breeze, you have a blockage.
Imagine trying to breathe through a straw that is pinched shut.
That is what your AC system is trying to do.
3. Increased Allergy Symptoms
If you start sneezing the moment you drive down the road, check your filter.
A dirty filter can no longer trap allergens effectively.
It might even be blowing trapped pollen back into your face.
4. Foggy Windows
This one surprises people.
If your windshield fogs up easily and takes forever to clear, it’s an airflow issue.
You need clean, dry air to defog windows.
A clogged filter traps moisture, making it impossible to clear the glass quickly.
Why This 10-Minute Swap Matters (More Than You Think)

You might be thinking, "I can live with a little dust."
But changing this filter isn't just about comfort.
It is about the longevity of your vehicle.
When a filter is clogged, your blower motor has to strain to pull air through it.
Over time, this added stress can burn out the motor.
Replacing a blower motor is difficult and expensive.
Replacing a filter is cheap and easy.
Furthermore, we need to talk about air quality.
If you live in a city or commute in heavy traffic, you are driving through a soup of exhaust fumes and particulate matter.
The air inside your car can actually be more polluted than the air outside if it isn't being filtered correctly.
By swapping this out, you are protecting your respiratory health.
It is a small investment for a massive return in well-being.
Step-by-Step: How to Change Your Cabin Air Filter
Okay, let’s get to the fun part.
You do not need to be a mechanic to do this.
You usually don’t even need tools.
I have taught people who have never opened a hood how to do this in the parking lot of an auto parts store.
Step 1: Buy the Right Part
Go to your local auto parts store or look online.
Enter your car’s make, model, and year.
Double-check to ensure you are buying the Cabin Air Filter, not the Engine Air Filter.
They are different shapes and sizes.
Step 2: Locate the Access Point
In 90% of vehicles, the filter is located behind the glove box.
Sit in the passenger seat.
Open the glove box and empty it out.
(This is a good excuse to throw away those old receipts, anyway).
Step 3: Lower the Glove Box
This is the only "tricky" part, but don't panic.
Look for a stopper arm on the outside of the glove box door.
It usually unclips or slides off.
Next, squeeze the sides of the glove box inward.
This releases the plastic tabs holding it up.
The glove box should swing down toward the floor, revealing a black plastic rectangular cover behind it.
Step 4: Remove the Old Filter
You will see a plastic cover with clips on the sides.
Pinch the clips and pull the cover off.
You will see the edge of the old filter.
Slide it out gently.
Prepare yourself—it’s going to be dirty.
You will likely see leaves, bugs, and a layer of gray soot.
Take a moment to appreciate that you haven't been breathing that stuff in directly.
Step 5: The "Airflow" Arrow
This is the most important step.
Look at the new filter.
You will see an arrow printed on the side that says "Airflow."
You need to install the filter so the arrow points in the direction the air is blowing.
Usually, the air blows down from the cowl to the blower fan.
Check the old filter you just pulled out.
Which way was its arrow pointing?
Match that direction with the new filter.
If you put it in backward, it will still work, but it will reduce efficiency and clog faster.
Step 6: Button It Up
Slide the new filter in.
Snap the plastic cover back on.
Lift the glove box, squeeze the sides to re-engage the tabs, and reattach the stopper arm.
Put your registration and napkins back in.
You are done.
Picking the Right Filter: Not All Are Created Equal
Before you run out and buy the cheapest filter you can find, let’s talk options.
Just like coffee, you have different blends available.
At My Core Pick, we believe in getting the best bang for your buck.
The Standard Paper Filter
This is the white, pleated filter.
It is the cheapest option (usually $10-$15).
It catches dust and debris.
It works fine, but it won’t do much for smells.
The Activated Charcoal Filter
These look gray, not because they are dirty, but because they are treated with carbon.
I highly recommend these.
They usually cost $5 to $10 more than the paper ones.
The charcoal absorbs odors, exhaust fumes, and smoke.
If you ever drive past a skunk or a cattle farm, you will thank me for choosing the charcoal option.
The HEPA Filter
Some brands now offer HEPA-grade filters for cars.
These filter out incredibly small particles (PM2.5).
If you have severe allergies or asthma, this is the gold standard.
However, they are denser, so they can slightly reduce maximum airflow speed.
For most drivers, the Activated Charcoal/Carbon filter is the "sweet spot" of price and performance.
Conclusion
Car maintenance often feels overwhelming and expensive.
It feels like something you have to outsource to experts.
But changing your cabin air filter is a win for the little guy.
It is a DIY task that provides instant gratification.
As soon as you turn the key and blast the AC, you will feel the difference.
The air will be crisp.
The smell will be gone.
And you will have the satisfaction of knowing you saved money while taking care of your car.
So, go check your owner’s manual or do a quick search online.
Order that filter today.
Your lungs (and your passengers) will thank you.